Saturday, February 18, 2017

Turn Off or Disable VoiceOver for iPhone 6/Tắt hay Vô hiệu hóa VoiceOver cho iPhone 6 . 

Edited by Grimm, Crystal, Eng, VisiHow and 2 others
You're watching VisiHow. This is a tutorial on how to turn off or disable VoiceOver on your iPhone 6.
Turn off or disable VoiceOver for iPhone 6.mp4-canvas166 048956.jpg
Ad

Steps/Các bước  

  1. 1
    Press the home button at the bottom of the phone one time to open up the phone.
    It will read us the time/Bấm nút Home một lần để mở phone .
    Turn off or disable VoiceOver for iPhone 6.mp4-canvas12 669746.jpg
  2. 2
    Now, we need to swipe to unlock using 3 fingers/Bây giờ , chúng ta cần quét để mở khóa bằng cách dùng 3 ngón tay .
    Those of us who have accidentally turned this option on might discover that we can't unlock the phone using one/Những ai đã lở kích hoạt chức năng này có thể khám phá rằng chúng ta không thể mở khóa phone khi đã dùng chức năng này . 
    Turn off or disable VoiceOver for iPhone 6.mp4-canvas24 635384.jpg
  3. 3
    Enter in the passcode by tapping on a number, then double-tapping anywhere on the screen, or press a finger onto the home button/Nhập mật mã bằng cách nhấp vào 1 số nào đó , kế đó nhấp 2 lần bất cứ chỗ nào trên màn hình , hay bấm vào nút Home . 
    VoiceOver will list the first three applications on the home screen, then say "double tap to open"/VoiceOver sẽ liệt kê ba ứng dụng đầu tiên trên màn hình , rồi nói "double tap to open" We're going to demonstrate how to quickly and easily turn off the VoiceOver feature/Chúng tôi sắp chứng tỏ làm thế nào để nhanh chóng và dễ dàng vô hiệu hóa chức năng này . 
    Turn off or disable VoiceOver for iPhone 6.mp4-canvas39 282286.jpg
  4. 4
    Start by pressing on the settings icon, then double tapping on the icon/Khởi động bằng cách nhấn vào icon Settings , kế đó nhấp hai lần vào icon này . 
    The settings icon is the silver and gray icon with gears. After tapping on it once, it will say "Settings. Double tap to open"/Sau khi nhấp icon này 1 lần , nó sẽ nói "Settings. Double tap to open" . 
    Turn off or disable VoiceOver for iPhone 6.mp4-canvas117 526867.jpg
  5. 5
    We need to go down to the "General" setting/Chúng ta sẽ tới phần "General" . 
    Tap once and the phone will say "General", then tap twice to open it/Nhấp 1 lần vào "General" và phone sẽ nói "General" , kế đó nhấp 2 lần để mở "General" .
    Turn off or disable VoiceOver for iPhone 6.mp4-canvas135 282869.jpg
  6. 6
    Tap on "Accessibility" and the phone will say "accessibility", then double tap it to open it/Nhấp vào "Accessibility" và phone này sẽ nói "accessibility" , kế đó nhấp 2 lần để mở nó . 
    Turn off or disable VoiceOver for iPhone 6.mp4-canvas144 242666.jpg
  7. 7
    Tap on "VoiceOver" at the top and the phone will say "VoiceOver On Button", then double tap it/Nhấp vào "VoiceOver" và phone sẽ nói "VoiceOver On Button" , kế đó nhấp 2 lần vào "VoiceOver" . 
    That will take us into the VoiceOver menu/Điều này sẽ đi chúng ta tới tới menu của VoiceOver. 
    Turn off or disable VoiceOver for iPhone 6.mp4-canvas153 304049.jpg
    Was this step helpful? Yes | No | I need help
  8. 8
    Tap on the green VoiceOver switch, then double tap it/Nhấp vào VoiceOver , kế đó nhấp 2 lần . 
    It will say "VoiceOver off"/Nó sẽ nói "VoiceOver off" . 
    Turn off or disable VoiceOver for iPhone 6.mp4-canvas168 529283.jpg
  9. 9
    Now, if we tap anything, like the back arrow in the top left-hand corner, it won't say anything/Bây giờ , nếu ta nhấp bất cứ cái gì , như mủi tên đen ở góc trên trái , nó sẽ không nói gì . 
    Turn off or disable VoiceOver for iPhone 6.mp4-canvas181 24768.jpg
    Was this step helpful? Yes | No | I need help
  10. 10
    Tap on the home button at the bottom of the phone to go to the home screen/Nhấp vào nút Home để tới trang nhà . 
    Turn off or disable VoiceOver for iPhone 6.mp4-canvas188 581121.jpg
  11. 11
    Double tap the home button and swipe the settings window up to close it so it's not draining the battery/Nhấp 2 lần nút Home và vuốt nhẹ từ dưới lên trên để đóng lại màn hình để tiết kiệm pin .
    Tapping on the home screen will bring us back to the home screen. Now, VoiceOver has been successfully turned off on the iPhone 6/Nhấp nhẹ vào màn hình sẽ làm màn hình xuất hiện . Bây giờ , VoiceOver đã được vặn tắt trên iphone 6 . 
    Turn off or disable VoiceOver for iPhone 6.mp4-canvas191 094898.jpg
    Was this step helpful? Yes | No | I need help
  12. 12
    If you need additional help or assistance with your iPhone 6 or anything else to do with it, do us a favor and let us know in the comment section below.
    Thanks for choosing VisiHow. Have a great day.

Thursday, February 16, 2017

The Motorola Moto G and Moto G 4G offer up the usual array of messaging capabilities, but thanks to the inclusion of Android Lollipop/Android 4.4.2 (and Android 4.3 before them) you get not one, but two text messaging clients.
http mos futurenet com techradar art mobile phones Motorola Moto 20G Screenshots KitKat Interface 02 210 100 jpg
There's the stock Messaging application which will be familiar to anyone who has used an Android phone in the past. It's a minimalist, intuitive interface with a list of all your message streams and options at the base of the display to create a new SMS, search your current messages and a basic menu.
Profile pictures are pulled through from contact cards which makes the app look a little better - although the lack of Facebook and Twitter integration means you'll still end up with a lot of blank tiles.
This is all very well and good, but Google is looking consolidate messaging apps by bringing together SMS and what was known as Google Talk into the Hangouts application.
In terms of text messages Hangouts works in a very similar way to the standard Messaging app, albeit with a slightly different look. But mixed up in your text messages are also instant messaging streams, allowing you to talk to more people from a single app.
Talking of things coming in twos, you're also treated to two email clients on the Moto G and Moto G 4G, with the Gmail app living alongside the standard Email offering.
http mos futurenet com techradar art mobile phones Motorola Moto 20G Screenshots KitKat Interface 02 210 100 jpg
If you only deal with Google's email setup then you can completely disregard the stock Email app and focus all your efforts on the intuitive Gmail client.
From here you can manage multiple Googlemail accounts, with an attractive and colorful interface making it a seamless and pleasing experience.
Those of you with other accounts outside of the search giant's remit will have to go to the stock Email app where you'll be able to sign in to all manner of addresses - you can even stick your Gmail accounts in here.
There's a unified inbox on offer, allowing you to see all your messages in one place, but you can also filter by account if things start to get a little confusing.
HTML emails load in a fully zoomed out view in both apps, allowing you to easily navigate to the area you want without a lot of frantic scrolling.
The Moto G and Moto G 4G look set up for the younger generation with a low price and interchangeable covers, so I was a little puzzled when I found Motorola hadn't pre-installed the likes of Facebook and Twitter.
http mos futurenet com techradar art mobile phones Motorola Moto 20G Screenshots KitKat Interface 02 210 100 jpg
It's not a huge issue, as a quick trip to Google Play quickly resolves this, but it is a little frustrating. Although with Google breathing down its neck, perhaps these pre-installs were out of the question for the Moto G and Moto G 4G.
In terms of an input method you get the stock Android keyboard, which is a serviceable offering with word prediction and auto-correct, although I'd still recommend downloading a third party option such as SwiftKey if you're planning on doing a lot of typing.
The responsive 4.5-inch touchscreen aids typing speed, and provides enough space to ensure the keys are not cramped. Rotating the Motorola Moto G 90 degrees will see the keyboard adjust to the landscape view, giving you larger keys.

Saturday, February 11, 2017

Transfer content from your previous iOS device to your new iPhone, iPad, or iPod touch/Chuyển nội dung từ thiết bị iOS cũ sang iPhone , iPad , hay iPod . 

Set up your new iOS device from a backup of your previous iPhone, iPad, or iPod touch/Cài đặt thiết bị iOS mới của bạn từ một sao lưu (backup) của iPhone , iPad , hay iPod cũ của bạn .

Before you begin/ Trước khi bắt đầu 

  • If you have an Apple Watch and got a new iPhone, unpair your Apple Watch from your previous iPhone before you set up your new device. Unpairing automatically backs up your Apple Watch so you can restore it after you pair with a new iPhone/Nếu bạn có 1 Apple Watch và mới có 1 iPhone mới , bỏ ghép nối (unpair) Apple Watch của bạn từ iPhone cũ trước khi bạn cài đặt thiết bị mới của bạn . Việc bỏ ghép nối sẽ tự động sao lưu Apple Watch của bạn để bạn có thể phục hồi nó sao khi bạn ghép nối với 1 iPhone mới của họ . 
  • To move your content from an Android phone to your new iPhone, learn what to do/Để chuyển nội dung của bạn từ 1 phone Android tới iPhone mới của bạn , học cách để làm ở đây .  

Use iCloud/Dùng iCloud

Use the steps in this section to back up your previous device in iCloud and to transfer the backup to your new device/Dùng những bước này trong đoạn này để sao lưu thiết bị trước đây trên iCloud và chuyển sao lưu này tới thiết bị mới của bạn .
         Turn on iCloud Backup

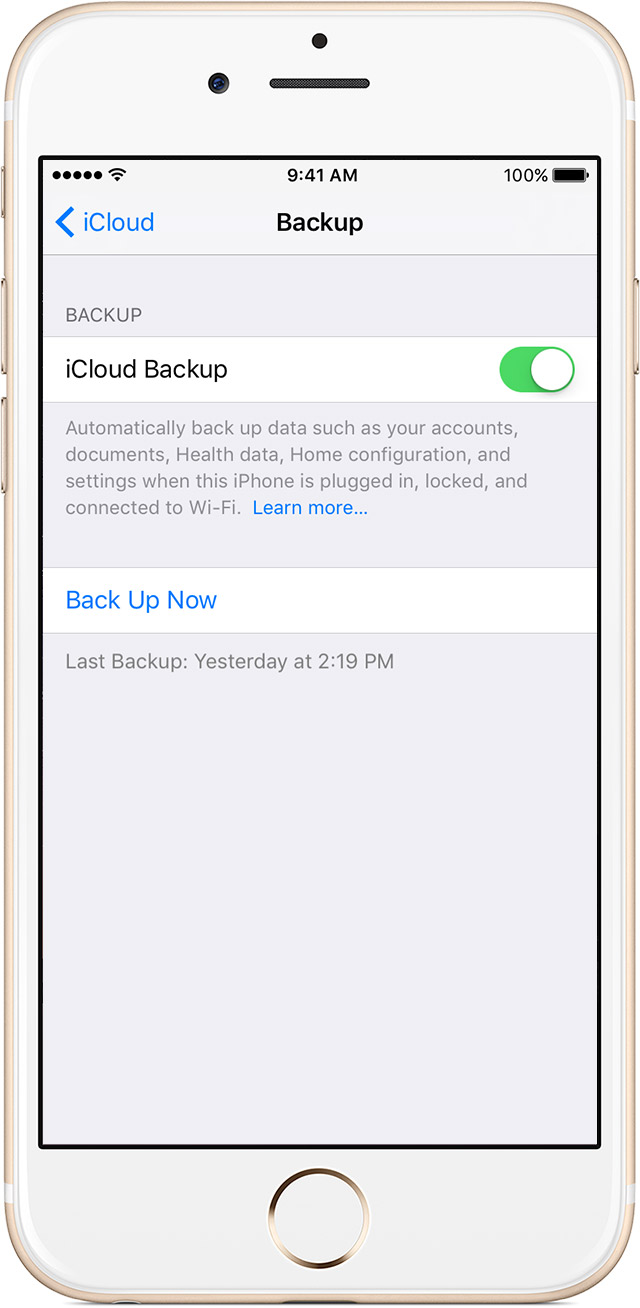
    Make an iCloud backup/Tạo sao lưu trên iCloud 

    1. Connect your previous device to the Internet with Wi-Fi/Nối kết thiết bị cũ với Internet qua wifi .
    2. Go to Settings > iCloud > Backup/Vào Settings > iCloud > Backup
    3. Make sure that iCloud Backup is turned on/Phải nhớ bật iCloud Backup . 
    4. Tap Back Up Now/Nhấp Back Up Now 
    5. Stay connected to Wi-Fi until the process finishes/Giử nối kết với Wifi cho tới khi quá trình kết thúc . 

    Transfer your SIM card or contact your carrier/Chuyển thẻ SIM hay tiếp xúc nhà mạng 

    If your new device needs a SIM card, here's what you need to do/Nếu thiết bị mới cần thẻ SIM , đây là điều bạn cần làm : 
    • If your carrier gave you a new SIM card, put it in your new device/Nếu nhà mạng cho bạn 1 thẻ SIM mới , hảy gắn vào thiết bị mới của bạn .  
    • If your new device uses the same kind of SIM card as your previous device, transfer the SIM card to your new device/Nếu thiết bị mới của bạn dùng thẻ SIM giống thẻ ở thiết bị cũ của bạn , hảy chuyển thẻ này vào thiết bị mới của bạn . 
    • If your new device needs a different kind of SIM card than what you have, or if you aren't sure, contact your carrier/Nếu thiết bị mới của bạn cần 1 thẻ SIM khác với thẻ mà bạn có , hoặc nếu bạn ko chắc , hảy tiếp xúc nhà mạng .
    Then use the steps below to transfer your iCloud backup to your new device/Kế đó dùng những bước dưới đây để chuyển sao lưu iCloud tới thiết bị mới của bạn . 

    Transfer an iCloud backup to a new device     

    Transfer your iCloud backup to your new device/Chuyển sao lưu iCloud của bạn tới thiết bị mới

    1. Turn on your new device. A "Hello" screen should appear. If you've already set up your new device, you need to erase it before you can use these steps.*/Bật thiết bị mới của bạn . Chữ "Hello" xuất hiện . Nếu bạn ĐÃ cài đặt thiết bị mới của bạn , bạn cần xóa trước khi bạn có thể dùng những bước này * . 
    2. Press the Home button when you see the "Hello" screen. Follow steps until you see the Wi-Fi screen/Bấm nút Home khi bạn thấy chữ "Hello" 
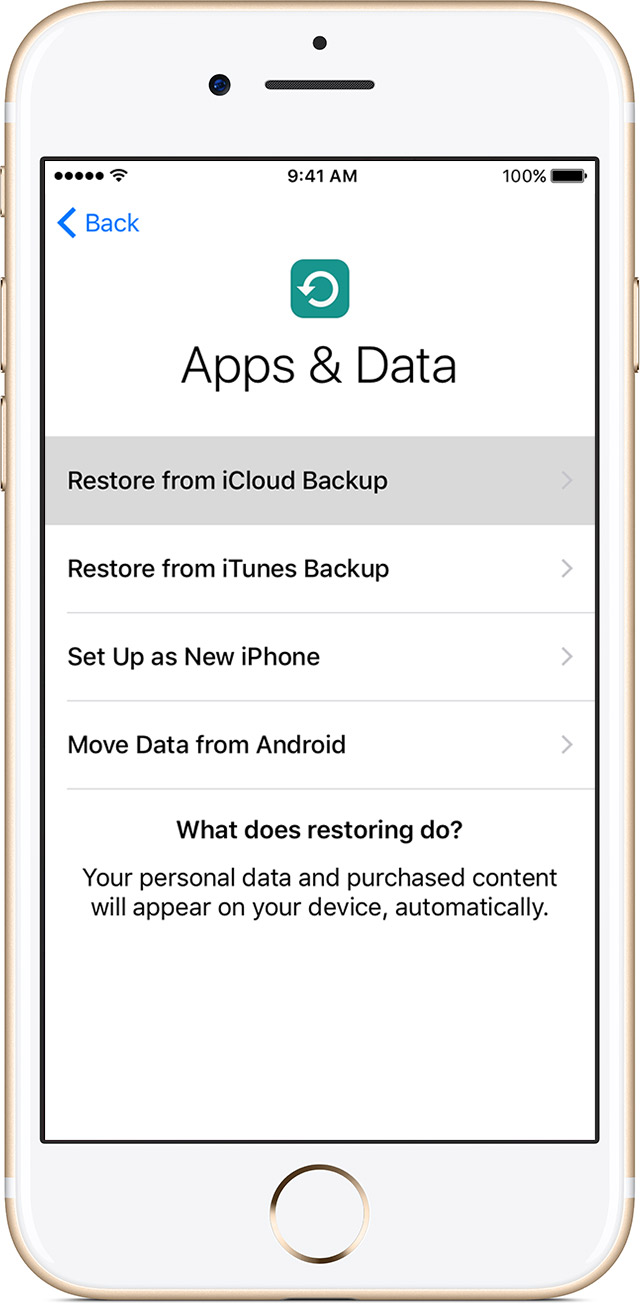
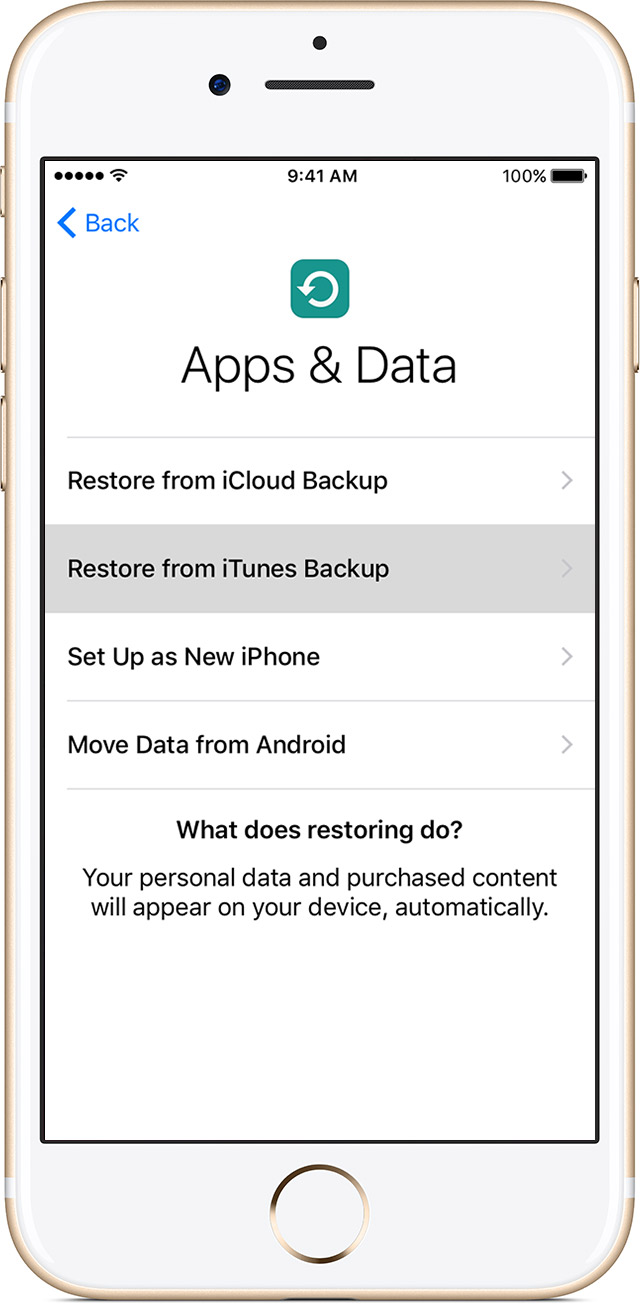
    3. Tap a Wi-Fi network to join. Follow steps until you see the Apps & Data screen, then tap Restore from iCloud Backup > Next/Nhấp Wi-fi network để nối kết . Theo các bước cho tới khi bạn thấy hiện chữ "Apps & Data" , kế đó nhấp Restore từ iCloud Backup > Next .
    4. Sign in to iCloud with your Apple ID and password/Đăng nhập iCloud với Apple ID và mật mã .  
    5. When asked, choose a backup. Make sure it's the correct one by checking the date and size of each. If asked to update to a newer version of iOS, learn what to do/Khi được hỏi , chọn 1 sao lưu . Hảy chắc chắn đó là sao lưu đúng bằng cách kiểm tra ngày và kích cỡ của mỗi sao lưu . Nếu được hỏi để cập nhựt một phiên bản mới của iOS , hảy học để làm ở đây . 
    6. If you purchased iTunes or App Store content using multiple Apple IDs, you'll be asked to sign in to each. If you can’t remember the passwords, you can skip this step by tapping "Don't have an Apple ID or forgot it."/Nếu bạn đã mua nội dung iTunes hay Apple Store bằng cách dùng nhiều Apple ID , bạn sẽ được yêu cầu đăng nhập vào mỗi tài khoản này . Nếu bạn ko thể nhớ mật mã , bạn có thể bỏ qua bước này bằng cách nhấp "Don't have an Apple ID or forgot it."
    7. Stay connected and wait for the restore process to finish, then complete the rest of the onscreen setup steps. If possible, keep your device connected to Wi-Fi and plugged into power after setup/Tiếp tục kết nối và chờ quá trình phục hồi này kết thúc , kế đó hoàn tất phần còn lại của các bước cài đặt trên màn hình .  This allows content like your photos, music, and apps stored in iCloud to automatically download back to your device/Điều này cho phép nội dung như ảnh , nhạc , và các app đã chứa trong iCloud sẽ tự động tải về thiết bị của bạn 
    * To erase your device, tap Settings > General > Reset > Erase All Content and Settings. This will erase any data that's currently on your device. After you erase it, your device restarts and the "Hello" screen appears/* Để xóa thiết bị của bạn , nhấp Settings > General > Reset > Erase All Content and Settings . Điều này sẽ xóa bất cứ dữ kiện đang chứa trên thiết bị . Sau khi bạn xóa , thiết bị của bạn tái khởi động và chữ "Hello" xuất hiện . 

    Finish up/ Hoàn tất 

    Learn how to restore your Apple Watch from a backup and pair it with your new iPhone. Or if you normally use iTunes to sync content to your iOS device, connect your device to your computer and use iTunes to sync the additional content/Học cách để phục hồi Apple Watch từ 1 sao lưu và ghép nối (Apple Watch) với iPhone . Hoặc nếu bạn thường dùng iTunes để đồng bộ hóa nội dung với thiết bị iOS của bạn , hảy nối thiết bị của bạn với máy tính và dùng iTunes để đồng bộ hóa nội dung thêm vào . 

    Use iTunes/Dùng iTunes

    Use the steps in this section to back up your previous device in iTunes and to transfer the backup to your new device/Dùng những bước trong phần này để sao lưu thiết bị cũ trong iTunes và để chuyển sao lưu này tới thiết bị này . 
    If you don't encrypt your iTunes backup, Health and Activity data from your iOS device or Apple Watch won't be saved/Nếu bạn ko mã hóa sao lưu iTunes , dữ kiện về Sức khỏe và Hoạt động từ thiết bị iOS hay Apple Watch sẽ ko được lưu . 

    Make an iTunes backup of your previous device/Dùng iTunes để sao lưu thiết bị cũ của bạn . 

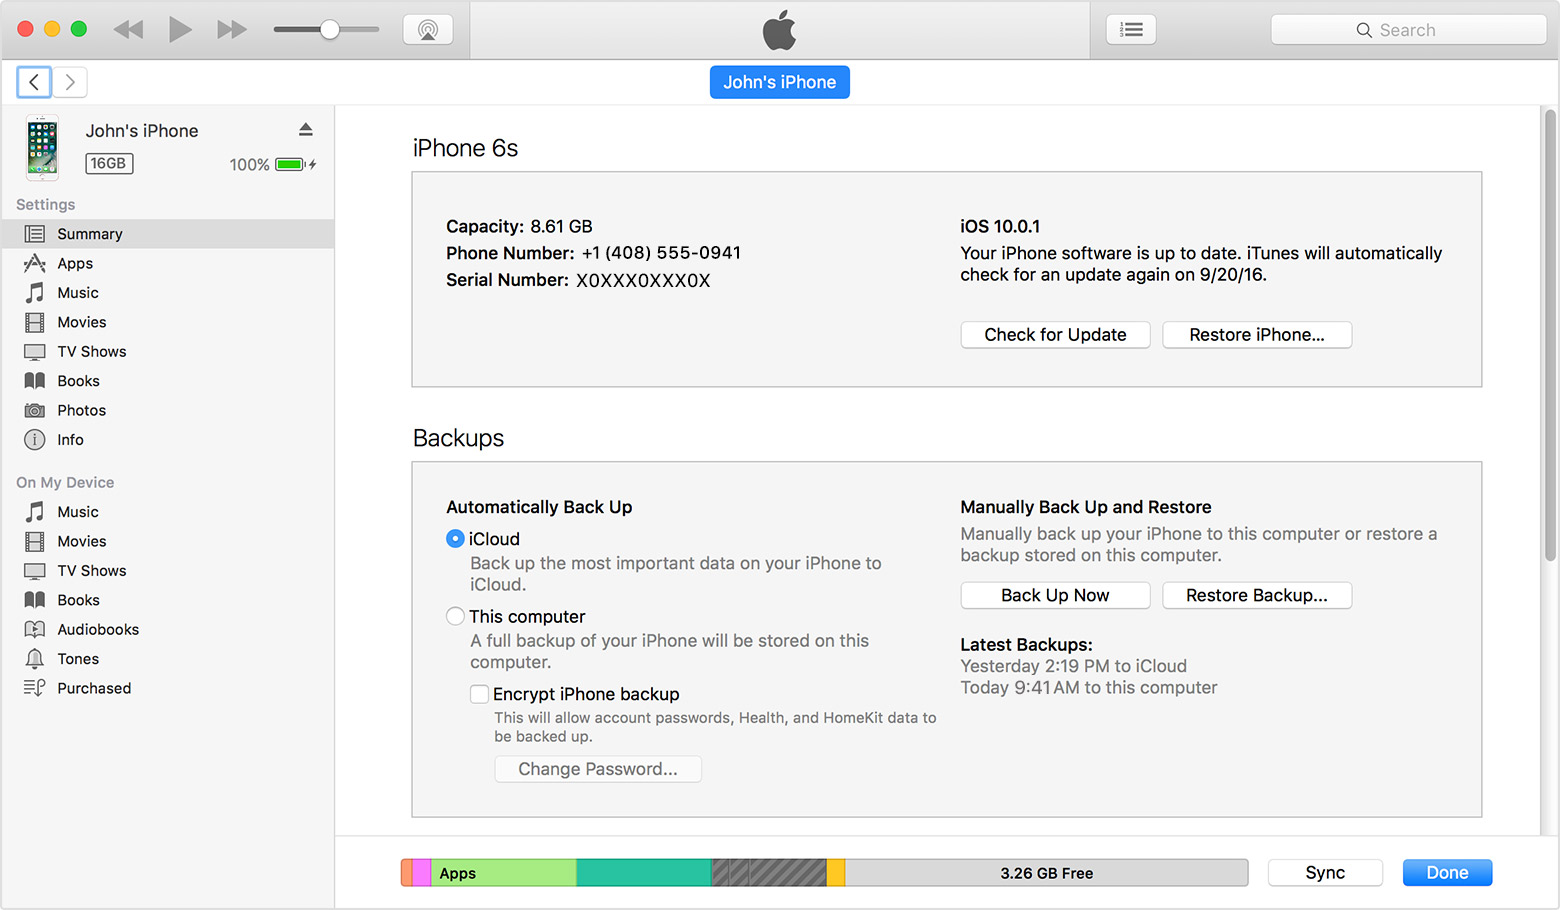
    1. Connect your previous device to your computer/Nối kết thiết bị cũ với máy tính của bạn
    2. Open iTunes and make sure that you have the latest version
    3. Select your device.
    4. If you want to save Health and Activity data from your iOS device or Apple Watch, you need to encrypt your backup: Select the box called Encrypt [device] backup and make a memorable password.

      Write down your password and store it somewhere safe, because there's no way to recover your iTunes backups without this password.If you don't need to save Health and Activity data, you can make a backup that isn't encrypted. Just click Back Up Now.
      Make an iTunes backup of your iPhone, iPad, or iPod touch
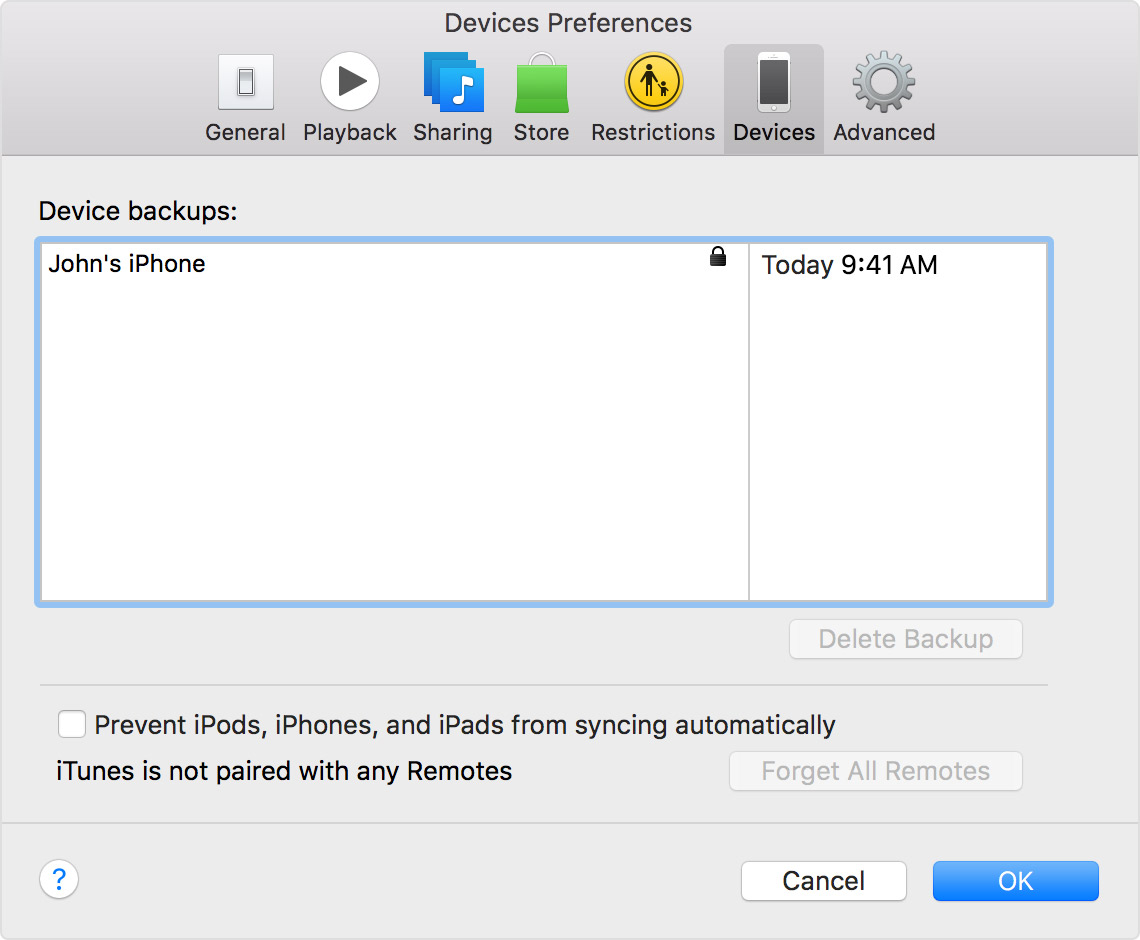
    5. After the process completes, make sure that your backup finished successfully in iTunes Preferences > Devices. You should see the name of your device and the date and time that iTunes created the backup. If you encrypted your backup, you should also see Lock icon beside your device's name.
      An iOS backup in iTunes

    Transfer your SIM card or contact your carrier

    If your new device needs a SIM card, here's what you need to do:
    • If your carrier gave you a new SIM card, put it in your new device. 
    • If your new device uses the same kind of SIM card as your previous device, transfer the SIM to your new device.
    • If your new device needs a different kind of SIM card than what you have, or if you aren't sure, contact your carrier.
    Then use the steps below to transfer your iTunes backup to your new device.

         Restore from an iTunes backup on your iPhone

    Transfer your iTunes backup to your new device

    1. Turn on your new device. A "Hello" screen should appear. If you already set up your new device, you need to erase it before you can use these steps.*
    2. Press the Home button when you see the "Hello" screen and follow steps until you see the Apps & Data screen, then tap Restore from iTunes Backup > next.
    3. Connect your new device to the computer that you used to back up your previous device.
    4. Open iTunes on your computer and select your device.
    5. Select Restore Backup. Then choose a backup. Make sure it's the correct one by looking at the date and size of each. If asked to update to a newer version of iOS, learn what to do.
    6. If you need to restore from an encrypted backup, enter your password when asked.
    7. Wait for the restore process to finish, then complete the rest of the setup steps on your iOS device. If possible, keep your device connected to Wi-Fi and plugged into power after setup. This allows content like your photos, music, and apps stored in iCloud to automatically download back to your device.
    * To erase your device, tap Settings > General > Reset > Erase All Content and Settings. This will erase any data that's currently on your device. After you erase it, your device restarts and the "Hello" screen appears.

    Finish up

    Learn how to restore your Apple Watch from a backup and pair it with your new iPhone. Or if you normally use iTunes to sync content to your iOS device, connect your device to your computer and use iTunes to sync that additional content.

    Get more help

    Sunday, February 5, 2017


    Nếu bạn muốn xem phim về cuộc triệt thoái cao nguyên năm 1975 (từ Pleiku xuống Phú yên ) theo tỉnh lộ 7 thì xin click vào link : www.cosmolearning.com/.../vietnam-war-1959-1975/ 

    Khi 1 trang hiện ra , ở phần Documentairies bạn chọn Battlefield Vietnam 1998 , chọn The Fall of Saigon (3/3) và > Play Video . Khi 1 trang hiện ra , > vào dấu i> (Play) và chờ phim đang tải xuống . Phim quay cảnh di tản trên TL 7 , vài chỗ có màu , chỗ rõ chỗ mờ vì tổng kết từ nhiều nguồn nhưng rất đáng xem vì nó nói lên nổi thống khổ của người dân trong cuộc chiến . 
    Chúng ta đều biết các nhà lảnh đạo VNCH đã dự cuộc họp tối mật ngày 14 tháng 3 năm 1975 tại Cam Ranh – đưa đến một quyết định gây choáng váng cho toàn dân toàn quân VNCH , là bỏ cả vùng Cao nguyên Trung phần rộng lớn , đưa các đơn vị chủ lực quân còn lại của Quân đoàn 2 rút lui về vùng duyên hải (tỉnh Phú Yên) theo liên tỉnh lộ (LTL) 7 , một con đường hư hỏng nặng và đã lâu không xử dụng ; để sau đó tái trang bị , bổ sung quân số, và tái chiếm Ban mê Thuột !?! Các vị này cho rằng việc triệt thoái sẽ thành công nhờ yếu tố bất ngờ vì nghĩ rằng quân cộng sản Bắc việt chỉ tập trung quân để ngăn cản mọi di chuyển trên quốc lộ 21 (Nha trang đi Ban mê thuột) và quốc lộ 19 (Qui nhơn đi Pleiku) . Nhưng làm sao giử được yếu tố bất ngờ khi một cuộc lui binh mà lại có sự tham dự của khoảng 180 ngàn dân thường . Chỉ vài ba ngày sau cuộc triệt thoái bắt đầu thì quân CSBV đã kéo đại pháo 130 ly tới quận lỵ Thuần mẩn (ở phía đông bắc của Ban mê thuột) và từ đây pháo xối xả và chính xác vào đoàn quân xa và dân xa đang triệt thoái trên LTL 7 nhất là vào thị trấn Cheo reo (tỉnh lỵ của tỉnh Phú bổn ) .( Quyển Where the Domino Fell thì cho biết “đại pháo của quân cs đã cắt đoàn người và xe di tản thành nhiều khúc . . .và hơn 100 ngàn dân và 15 ngàn quân đã chết trong cuộc rút lui này “ . Các nhà báo đã gọi tỉnh lộ 7 là con đường của máu và nước mắt vì trong suốt cuộc chiến vn chưa bao giờ có một cuộc lui binh mà tổn thất về quân và dân lại khủng khiếp như vậy . )
    Như ta đã biết , cuộc triệt thoái này đã mở đầu cho sự sụp đổ dây chuyền – giống như các con cờ domino – của các tỉnh và thành phố còn lại của miền nam Việt nam . 
    Từ xưa tới giờ , rút lui là 1 cuộc hành quân rất khó khăn đối các nhà quân sự , đằng này lại có sự tham dự của hàng trăm ngàn thường dân trốn chạy cộng sản thì thất bại là điều dễ hiểu . Đã vậy , lại có sự lủng củng , bất hòa trong hệ thống chỉ huy cuộc lui binh .

    Friday, February 3, 2017

    DÙNG CHỨC NĂNG SHARE ĐẾN 1 VÀI BẠN BÈ MÀ VẪN GIỬ ĐƯỢC SỰ RIÊNG TƯ CỦA HỌ .
    TRƯỚC NHỨT BẠN NHẤP SHARE VÀ CHỌN SEND AS MESSAGE .

    HÌNH TRÊN HIỆN RA .

    BẠN CHỌN SĨ PHAN .

    BẠN VIẾT VÀI CHỮ . 

    BẠN NHẤP SEND . 

    CÁCH DÙNG FB ĐỂ GỬI BÀI CÓ TÍNH RIÊNG TƯ CHO VÀI NGƯỜI BẠN , nghĩa là người khác không đọc được .
    Bạn làm theo các bước .

    Theo mặc định , bên trái của Post luôn luôn là chữ Public (mọi người) . 

    Bạn nhấp vào đó , sẽ hiện ra hình trên và bạn nhấp vào More Options (Thêm Chọn Lựa) .

    Bạn nhấp vào Only Me (Chỉ có tôi).

    Chữ Only Me hiện ra .

    Nếu bạn muốn bài này gửi cho anh Sĩ thì bạn nhập "Chào anh Sĩ" .

    Tới đây bạn nhấp vào hình người (có dấu +) vào gỏ chữ Sĩ , sẽ hiện ra danh sách những người có tên chữ Sĩ như "Sĩ Trần , Phan Sĩ , v.v..." ; bạn chọn Phan Sĩ . Bạn sẽ thấy sau chữ With là Sĩ  Phan .

    Nếu bạn muốn thêm ng nhận , ví dụ như Hạnh Phạm thì bạn gõ chữ Hanh , bạn sẽ thấy xuất hiện Hanh Pham , Hanh Nguyen , v.v... Khi bạn chọn Hanh Phạm thì tên ng sẽ hiện ra , xem hình . Nếu bạn đổi ý , ko muốn gửi cho Hanh Pham , bạn nhấp vào dấu X sau Hanh Pham . 
    Sau khi viết bài xong , bọn xem lại tên người nhận và nhấp Post . Chỉ có những người được bạn "tag" tên mới nhận , người ngoài ko đọc được . Thông thường , khi đã chọn 1 bài ở chế độ Only Me thì bài kế sẽ mặc định là Only Me . Nếu bạn ko muốn ở chế độ này thì nhấp vào chữ này để chọn People hay Friends , v.v... Chúc bạn thành công .