Chúng tôi khẳng định một chân lý hiển nhiên rằng mọi người sinh ra đều bình đẳng, rằng tạo hóa đã ban cho họ những quyền tất yếu và bất khả xâm phạm, trong đó có quyền sống, quyền được tự do và mưu cầu hạnh phúc . . . (Lời Mở Đầu Của Tuyên Ngôn Độc Lập Mỹ)
Wednesday, February 14, 2018
Here's how to protect your Yahoo account from hackers
Yahoo's 3 billions accounts were hacked. Instead of deleting your account, it's better to mothball it and move to another email service like Gmail.
The biggest data breach in history just tripled in size. Yahoo announced Tuesday that every single one of its 3 billion accounts were hacked from a 2013 breach. At the time of the attack, Yahoo claimed 1 billion accounts had been hacked, but after Verizon took over Yahoo, the company investigated further and discovered that all of its approximately 3 billion accounts were affected.
Why you shouldn't delete your Yahoo account
In an earlier version of this story, I suggested you simply delete your Yahoo account and move to Gmail, but it appears doing so may open another workaround for hackers. Yahoo recycles old email addresses, which means that 30 days after your account is deleted, someone could open a new account with your old Yahoo email address and potentially use it to gain access to your other accounts.
After opening an account with the address you vacated, a nefarious individual could impersonate you and fire off password resets requests to get into any of your other online accounts to which you've linked your Yahoo email.
So, instead of deleting your Yahoo account, I suggest you change your password, turn on two-step verification, disconnect all connected services and move to Gmail while leaving your Yahoo account inactive.
Change your password
The first order of business is to change your password. The hack exposed your password so if you do anything, that one thing should be to change your password to a strong password or passphrase that you don't use for any of your other accounts. And if you have repeated your old Yahoo password on any of your other accounts, go ahead and change the password for those accounts, too.
For Yahoo, log into Yahoo Mail, click the gear icon in the upper-right corner and click Account Info. A new tab will open. Click Account securityon the left and then click Change password.
Turn on two-step verification
On the same Account security page where you changed your password, scroll down and click the toggle switch to enable Two-step verification. Enter your phone number and click the Send SMS button and then enter the verification code that Yahoo sent you. Now, someone will need to steal both your password and your phone to get into your account.
Disconnect all connected services
Head back to your Yahoo Mail inbox, click the gear icon in the top-right and click Settings. On the Settings panel, click Accountson the left and you'll see the email accounts, social networks and cloud services connected to your Yahoo account. Click Disconnect on any that are listed as Connected to make it harder for a hacker who gains access to your Yahoo account from getting into your other accounts.
Switch from Yahoo Mail to Gmail
Gmail has a great tool to import data from other email accounts. Go to the inbox and click the gear-icon button in the upper-right corner and click Settings. Next, click Accounts and Import at the top of the page and then click Import mail and contacts. Here, you can enter your Yahoo email address and import your Yahoo data to Gmail. You can choose to import contacts, mail and new mail for the next 30 days.
Matt Elliott/CNET
Update, Oct. 4, 2017: This story was originally published Dec. 15, 2016 and has been updated to include new information.
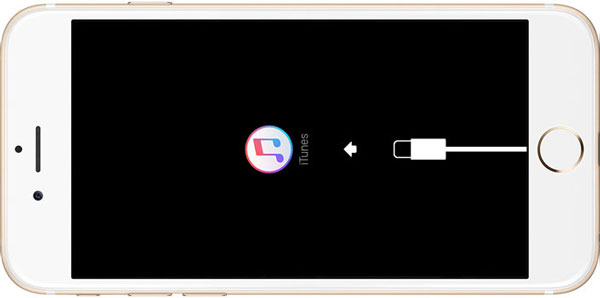
1. How to Delete Apple ID without Password, Using iTunes
You can enter your iPhone to recovery mode to reset it when Find My iPhone is turned off. Step 1: Make sure you have the latest version of iTunes. Connect your iPhone to the computer. Step 2: While connection, force restart your iPhone by pressing and holding the Home and Sleep/Wake buttons at the same time until you see the iTunes icon on iPhone. Step 3: When you enter the recovery mode, you will see a message with option to Restore or Update on iTunes. Step 4: Tap Restore.
Wait patiently until it finishes. Your iPhone will be reset and the Apple ID will be removed.
2. Some Tips to Retrieve Apple ID Password
2.1 How to Change Apple ID Password
Before discussing how to do an Apple password reset without Apple ID, let us quickly examine how to change Apple ID password in the standard way using your Apple ID password. Just follow the steps below.
Step 1: Sign in to your Apple account on appleid.apple.com page. Step 2: Scroll to the Security section and tap Change Password Step 3: You will need to input your current Apple ID password then you will input your new password and confirm it. Step 4: Now press Change Password Step 5: You can now use the new Apple ID password for all transactions.
2.2 Forgot Apple ID Password? How to Perform Apple ID Password Reset
In the previous steps you learned how to change your password using the Apple ID password, now I will show you how to do an Apple ID reset peradventure you have forgotten the Apple ID itself. Just follow the steps below.
Step 1: On your iPhone or iPad, go to Settings > iCloud. Step 2: Tap the email address at the top. Step 3: Click on the Forgot Apple ID or Password. Step 4: Enter your Apple ID. Step 5: Answer the security questions that you set up before. Then you can reset the Apple ID password. Step 6: Enter your new password and confirm it.
After resetting Apple ID password, I recommend that you set up a “two-factor authentication” or “two-step verification “process for your Apple account. These are very reliable and can still get through even if you forget your Apple ID or password.
3. How to Permanently Erase Data from iPhone to Avoid Data Recvoery
1,000,000+ Downloads
iMyFone Umate Pro for Win or for Mac is the safest iPhone dater eraser to permanently wipe data from iOS devices. It allows you to preview and selectively delete all kinds of iOS data thus protecting your privacy by ensuring that there is NO possibility of data recovery.
It applies Erase All Data feature to permanently reset iPhone. Unlike normal factory reset that just simply remove data from iPhone but not from device drive, iMyFone make all the data and settings completely gone.
Step 2: Select the “Erase Private Data” tab on iMyFone. Tap on the “Erase” button. Step 3: After manually typing Delete into the box, press Erase Now button to delete your all data and settings on your iPhone.
Key Features of Umate Pro
Any data that is erased by Umate Pro is 100% unrecoverable.
You can permanently delete all data or some specific private data selectively, avoiding accidental deletion.
Display and completely destroy the files that were deleted before, even from the device drive.
1 click to free up huge space for free by clearing junk files and temporary files.
A . Căn bản về camera của phone HTC P139100 (TITAN) . Nhấp mủi tên , chọn Camera hay bấm nút Camera ở hông phải của phone . Ngay cả màn hình tối đen , bạn vẫn chụp đc bằng cách bấm nút Camera . 1/ Ý nghĩa của 1 số icon/hình tượng , xem hình . Máy quay phim : thay đổi giửa chụp và quay . Người : thay đổi giửa camera trước và sau . Dấu + và - : phóng lớn, thu nhỏ . Bánh xe : settings/cài đặt . Mủi tên : trở lại . 2/ Trước khi chụp hay quay fim , bạn có thể phóng to thu nhỏ bằng cách nhấp + hay - . a/ Nhấp hình bánh xe để chọn : flash mode , độ phân giải , hiệu ứng , hay thứ khác . 2/ Để lưu các chọn lựa này , nhấp Save settings . Nếu ko , camera sẽ trở lại cài đặt mặc định cho lần dùng tới . Mẹo : Bạn có thể vào Start > Settings > Applications > pictures + camera , để thay đổi cách cài đặt cho nút Camera . B/ Chụp hình . 1/ Mở Camera . 2/ Nhấp hình bánh xe hay Settings . - Nhấp 1 trong các flash icon để chọn auto flash , mở hay tắt đèn flash . - Chọn độ phân giải và các cài đặt khác - mà bạn muốn dùng . 3/ Cầm chắc phone , hoặc đứng (ảnh chân dung) hay ngang ( ảnh phong cảnh) . Nếu bạn chụp 1 số ng , camera sẽ tự động nhận dạng mặt và điều chỉnh tiêu điểm (focus) . Bạn sẽ thấy các hộp (box) ở mặt ng . 4/ Trước khi chụp , bạn có thể phóng to hay thu nhỏ chủ thể/subject . 5/ Để chụp , bạn có thể : - Bấm nhẹ nút camera để chỉnh hình , và bấm mạnh nút này để chụp . Camera sẽ tự nhắm vào/auto focus vào giửa hình và chụp . - Hay nhấp vào nơi nào trên màn hình để nhắm vào và chụp . Camera sẽ tự nhắm vào và áp dụng tự động phơi sáng (auto exposure) trên nơi mà bạn nhấp . Ảnh sẽ đc lưu tại Camera Roll của Picture hub . C/ Quay phim . Để quay đẹp , cách tốt nhứt là chọn landscape . 1/ Mở Camera . 2/ Nhấp icon máy quay để chuyển qua video : sẽ thấy máy quay phim trên màn hình . 3/ Nhấp icon bánh xe : - Nhấp 1 trong các icon bóng đèn để cho đèn của camera tắt hay sáng lúc quay . - Chọn độ phân giải và các cài đặt khác mà bạn muốn . 4/ Trước khi quay , bạn có thể phóng to hay thu nhỏ chủ thể . 5/ Bấm nút camera để bắt đầu quay . Trong lúc quay , camera sẽ luôn luôn tự nhắm vào phần giửa của màn hình nếu bạn đã chọn continuous focus lúc cài đặt . 6/ Để ngừng quay , bấm nút camera . Phim này sẽ lưu ở camera roll . Mẹo vặt : đèn flash của camera ko mở ? Để tiết kiệm pin , camera sẽ vô hiệu hóa đèn flah , ngay cả bạn đã chọn auto flash hay flash on , trong trường hợp sau : - Bạn đang gọi phone . Sau khi hết gọi , bạn có thể dùng flash . - Mức pin đạt 20/100 hay thấp hơn . Nạp điện cho pin để camera có đủ pin hầu xài flash . - Trời lạnh ảnh hưởng đèn flash . Để đũ pin chạy flash , giử phone ấm áp . Khi ko dùng phone , để phone trong áo khoác để giử ấm , và cố gắng tránh thay đổi đột ngột có thể ảnh hưởng hiệu suất của pin . D/ Sau khi quay . Sau khi chụp hay quay , bạn có thể xem lại . Bạn có thể chọn phải làm gì với hình và video nay , như tải lên mạng hay gửi đi . 1/ Khi còn ở màn hình viewfinder , nhấp mủi tên . Hay trượt ngón tay trên màn hình : sẽ thấy ảnh hay video mới chụp . 2/ Nếu là ảnh , bạn nhấp nhẹ 2 lần hay dùng 2 ngón tay để mở ra hay thu nhỏ . Nếu là video , nhấp icon Play để xem . 3/ Nhấp ba dấu chấm để xem các chọn lựa như xóa , tải lên Facebook hay Skydrive , v.v... 4/ Dùng 2 ngón tay để xem cả cuộn phim/filmstrip . Bạn có thể kéo về phải hay trái để lướt qua các hình và video . 5/ Để tiếp tục quay , kéo nhẹ tay về trái nếu bạn cầm phone ngang hay kéo lên trên nếu cầm phone đứng cho tới khi bạn trở lại màn hình Viewfinder . Dịch từ : HTC P139100 Manual .